The Daily Grind: My 2007 Toyota 4runner

Author:

Published:

Updated:

Lifted 4th gen 4runner

Affiliate Disclaimer

As an affiliate, we may earn a commission from qualifying purchases. We get commissions for purchases made through links on this website from Amazon and other third parties.

Support us by sharing our content!

Boring vehicles aren’t worth driving. At least that’s how I feel, even when it comes to daily drivers. I’m not saying that everyone should be driving around in one-off Sema show cars. But putting in a little effort to make your vehicle suit your personality goes a long way. Having a car or truck that you look forward to driving makes the otherwise mundane moments in life a bit more exciting.

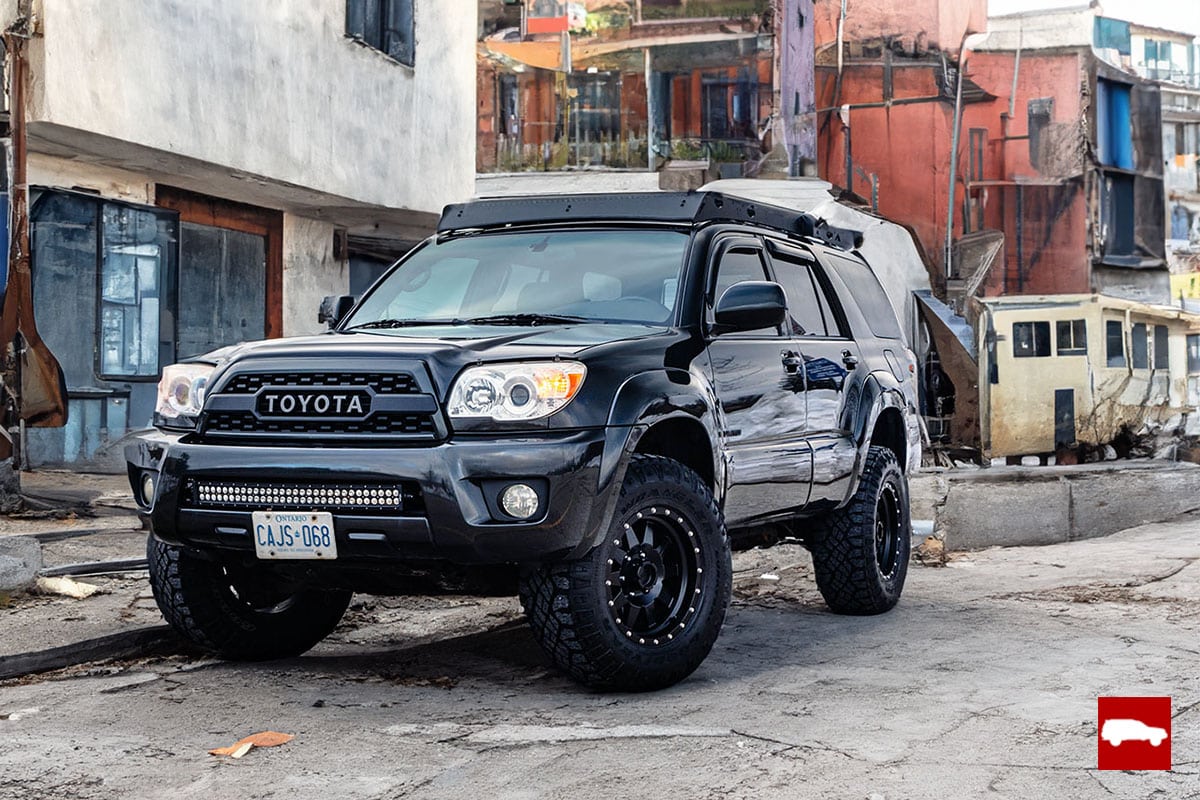
My 4runner might appear to be a custom rig at first glance, but it really isn’t. This is a great example of how some carefully chosen modifications can completely change a vehicles’ character. It’s mostly stock with a few important upgrades to make it reliable, capable, and fun to drive. Maybe it seems a bit mild to me because of the contrast with my highly modified MR2.

At any rate, it didn’t take much work to transform the 4runner into the perfect SUV for life in Canada. Despite its custom touches, it’s still a vehicle that I can use properly and rely on every day. Make sure to click on the photos to see the full size images!

Lifted 4th gen 4runner

The 4th generation Toyota 4runner was the perfect platform for me to start with. They have the ultimate combination of luxury and rugged capability. After owning a Jeep Grand Cherokee for 10 years before this, reliability and comfort were big factors in choosing my next vehicle.

Toyota did a great job of engineering the 4runner and they’re known across the world as being virtually bulletproof in terms of dependability. In my mind, it just needed a few simple changes to take it to the next level.

Balance is an important aspect for any project car, but it’s an even bigger deal when it comes to daily drivers. I didn’t want to sacrifice anything that makes the Toyota 4runner so legendary in order to improve specific parts.

I need it to be:

  • Quiet, comfortable and classy looking, yet capable on muddy trails as well as in deep snow
  • Consistently reliable
  • Spacious enough to load up with mountain bikes and gear
  • Able to tow at least 5,000 lbs but still be nimble in tight areas
  • As fuel efficient as possible but still offer a decent amount of power
  • Able to start and run in any temperature or weather

I wanted a well rounded vehicle and the V8 4runner does it all without compromise.

Lifted 4th gen 4runner

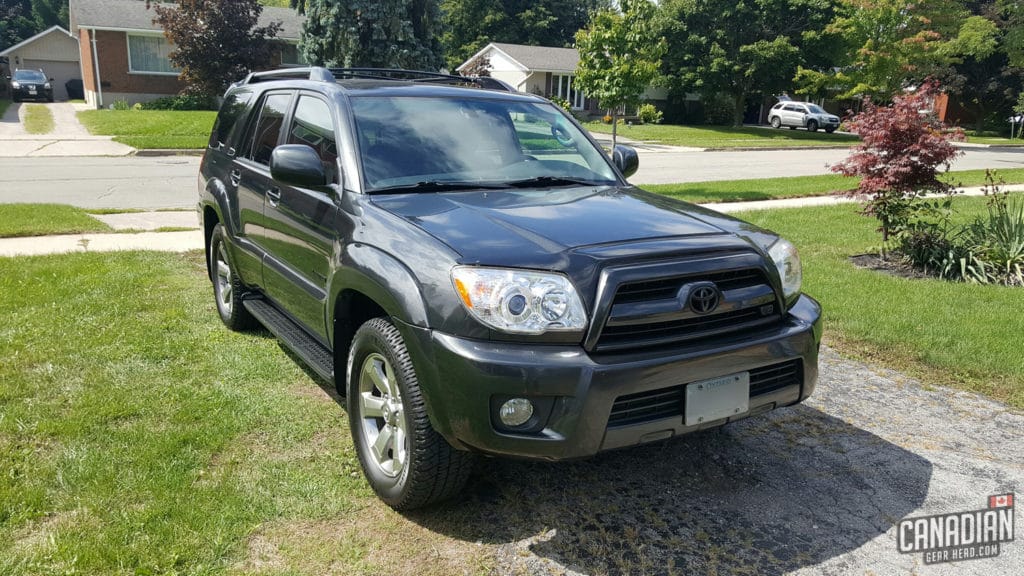
My starting point was a 2007 Toyota 4runner Limited V8. I was able to find a clean example with decent mileage and full service records. It had all the bells and whistles aside from factory navigation.

It didn’t hurt that Shadow Grey (or “Khaki” here in Canada) is one of the most sought after colors on the 4runner either. While it wasn’t necessarily in my idea of pristine condition, I could tell that I’d be able to polish it up and make the paint look incredible.

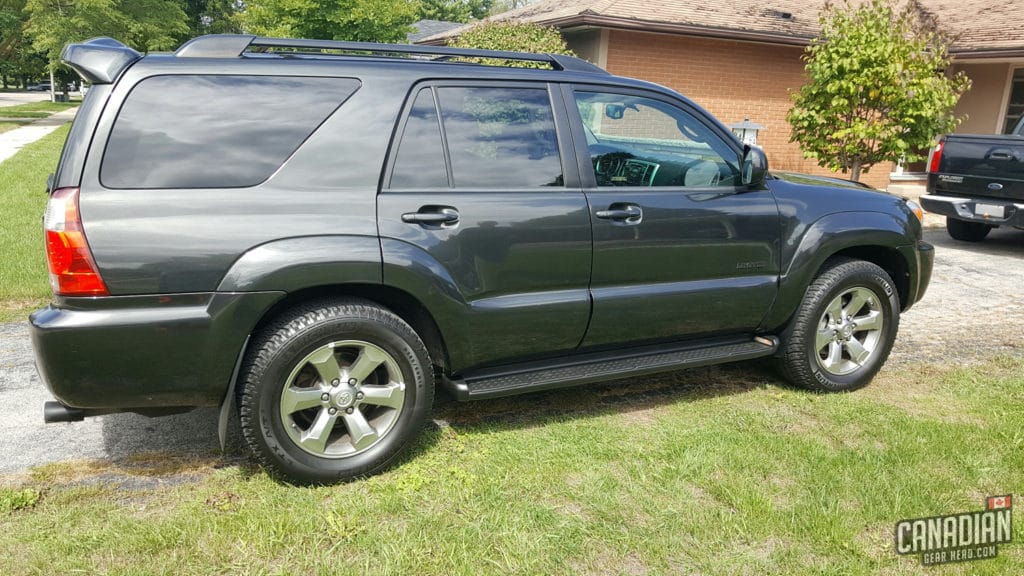
Mechanically, it had a couple flaws. It had the typical cracked exhaust manifold and leaking rear air suspension. These are the only two large failures known on this specific model of 4runner.

Although both are fairly expensive to fix at a dealership, replacing them with aftermarket upgrades is a different story. I was able to buy this one at a great price because of this. After those upgrades, I now have one of the most reliable vehicles on the planet. I guess you could say it drives and looks ok, too.

You wouldn’t be alone in mistaking my 4runner for an ultra-low mileage SUV that’s never seen winter. In reality, it’s the exact opposite. It’s 11 years old with over 210,000 kms on the clock. It gets driven in the harshest winter conditions and sits parked outside year round. Proper protection and care is what keeps it looking the way it does.

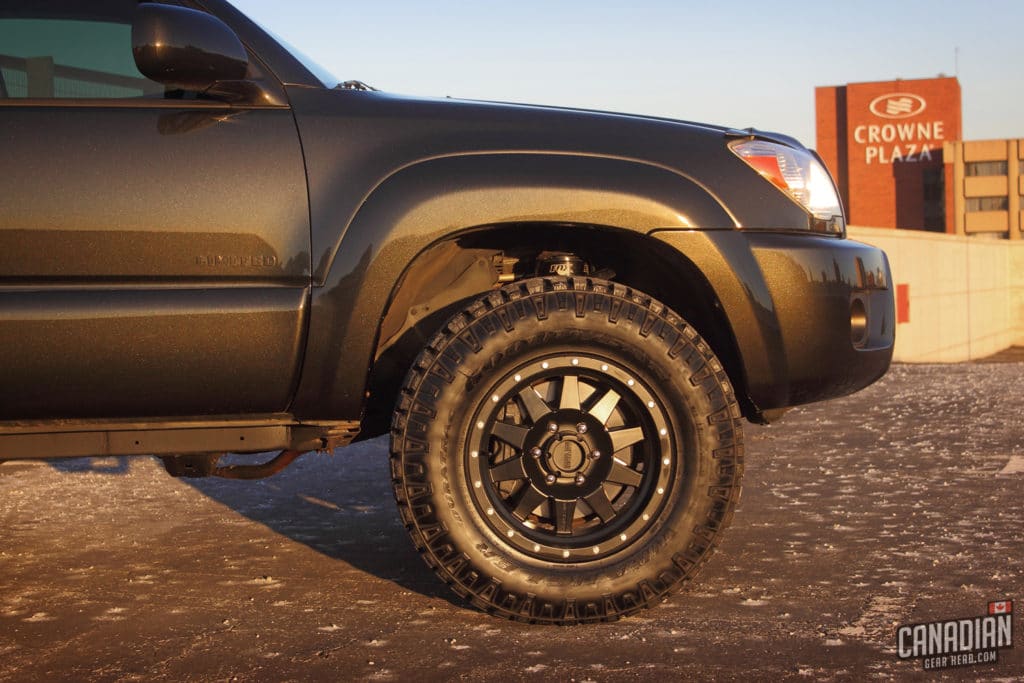
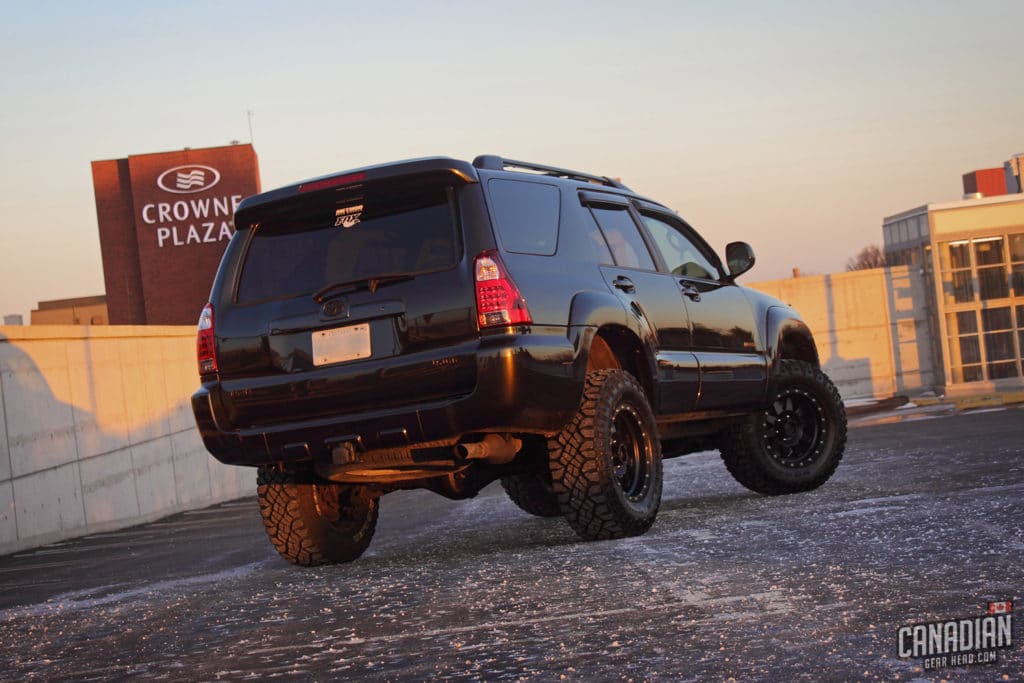
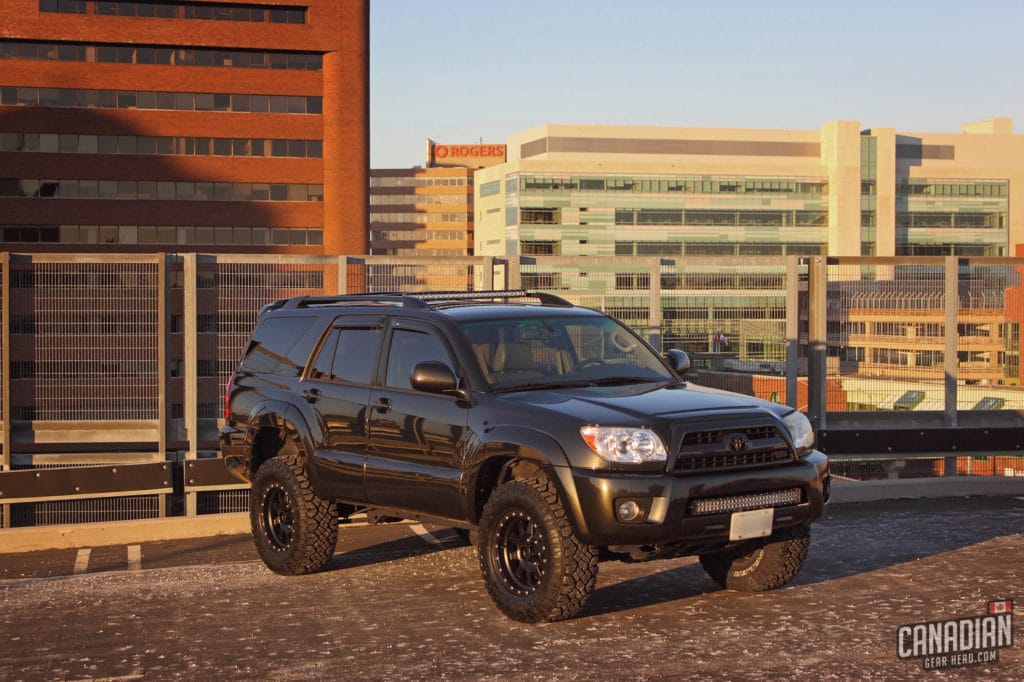
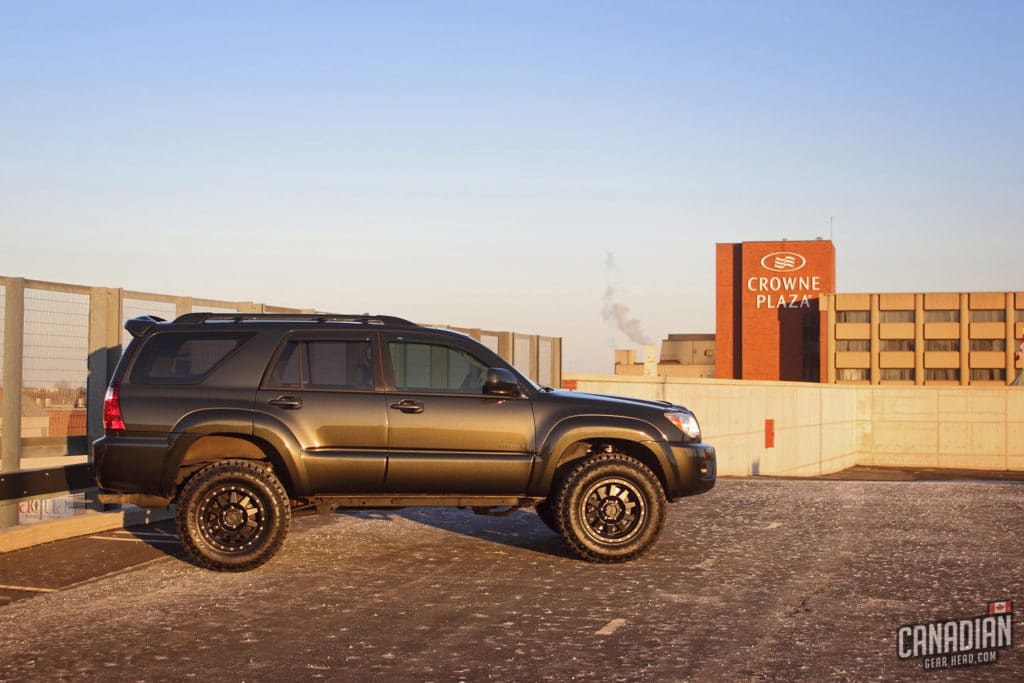
The tired old X-REAS suspension has been replaced with Fox 2.0 IFP adjustable coilovers up front. They provide a very controlled yet smooth ride and are completely rebuildable.

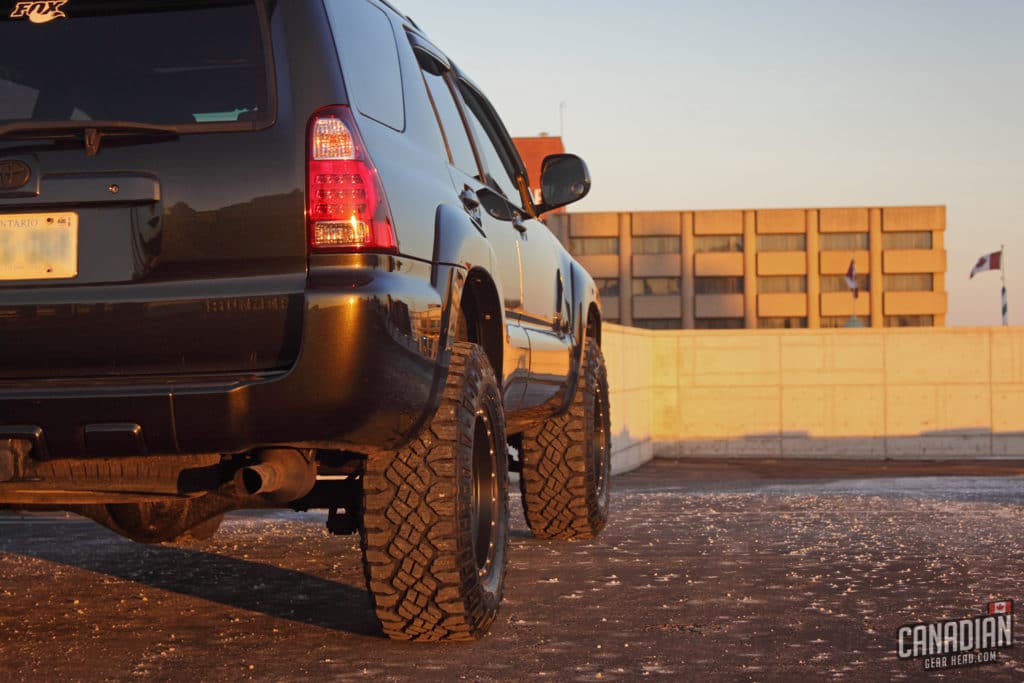
The leaky factory rear air suspension was completely removed. Now a pair of ARB’s Old Man Emu 895 rear springs is accompanied by Fox 2.0 IFP rear shocks to match the front. A coil spring conversion kit from Metal Tech holds the springs in place.

Lifted 4th gen 4runner

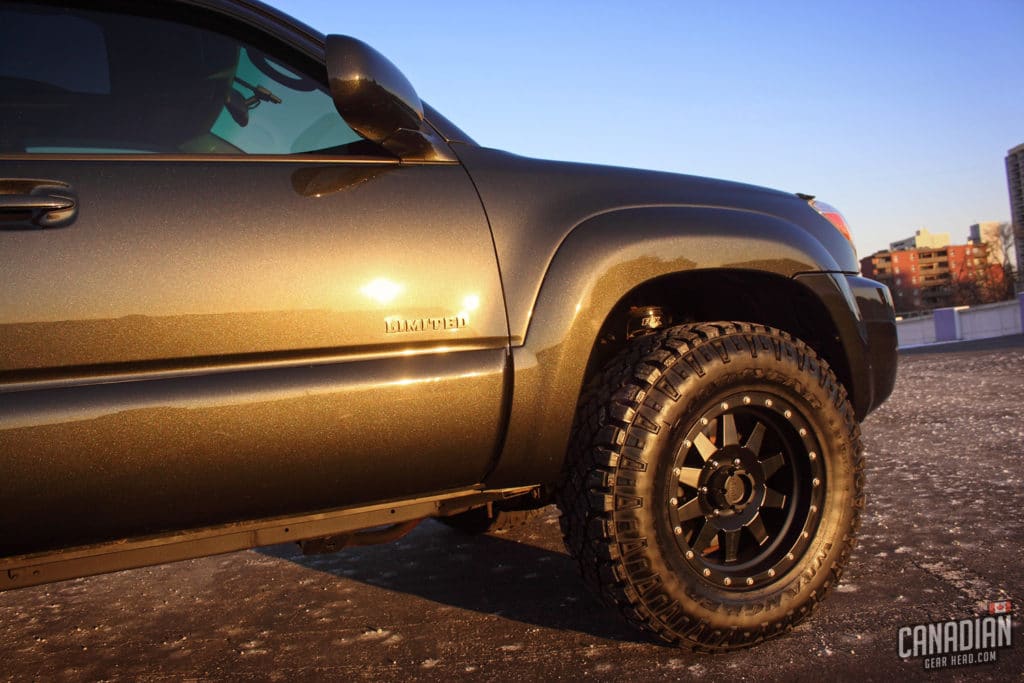
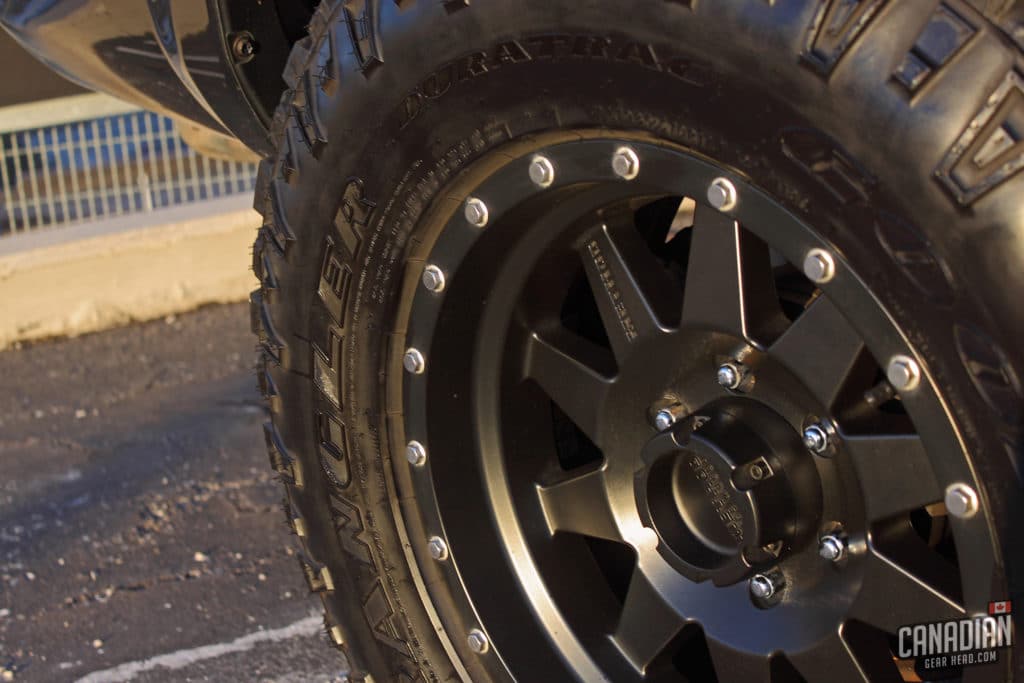
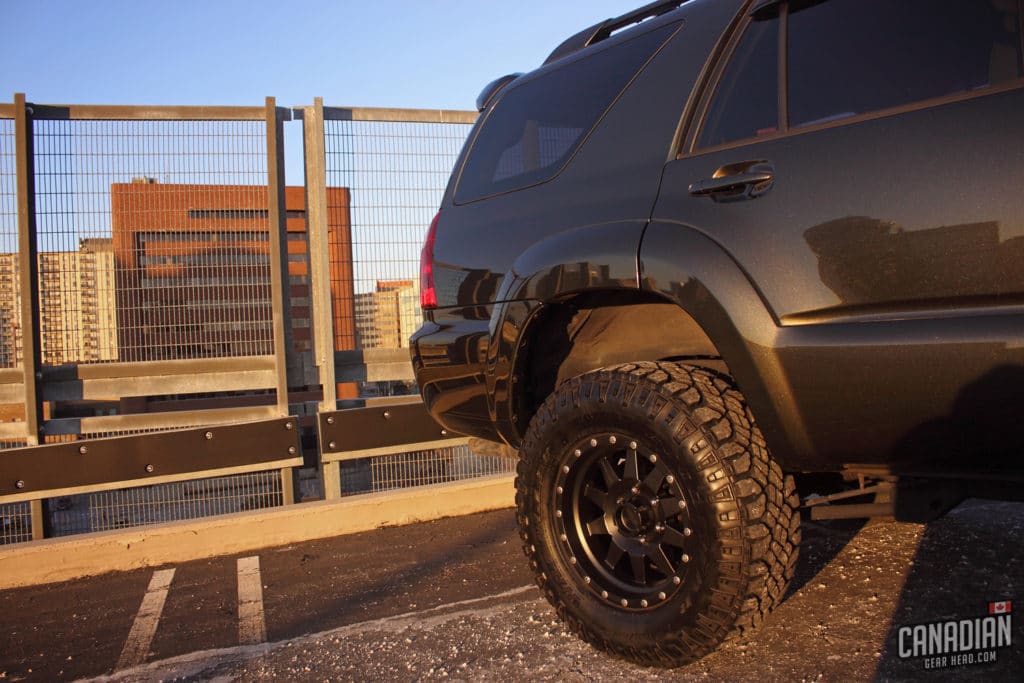
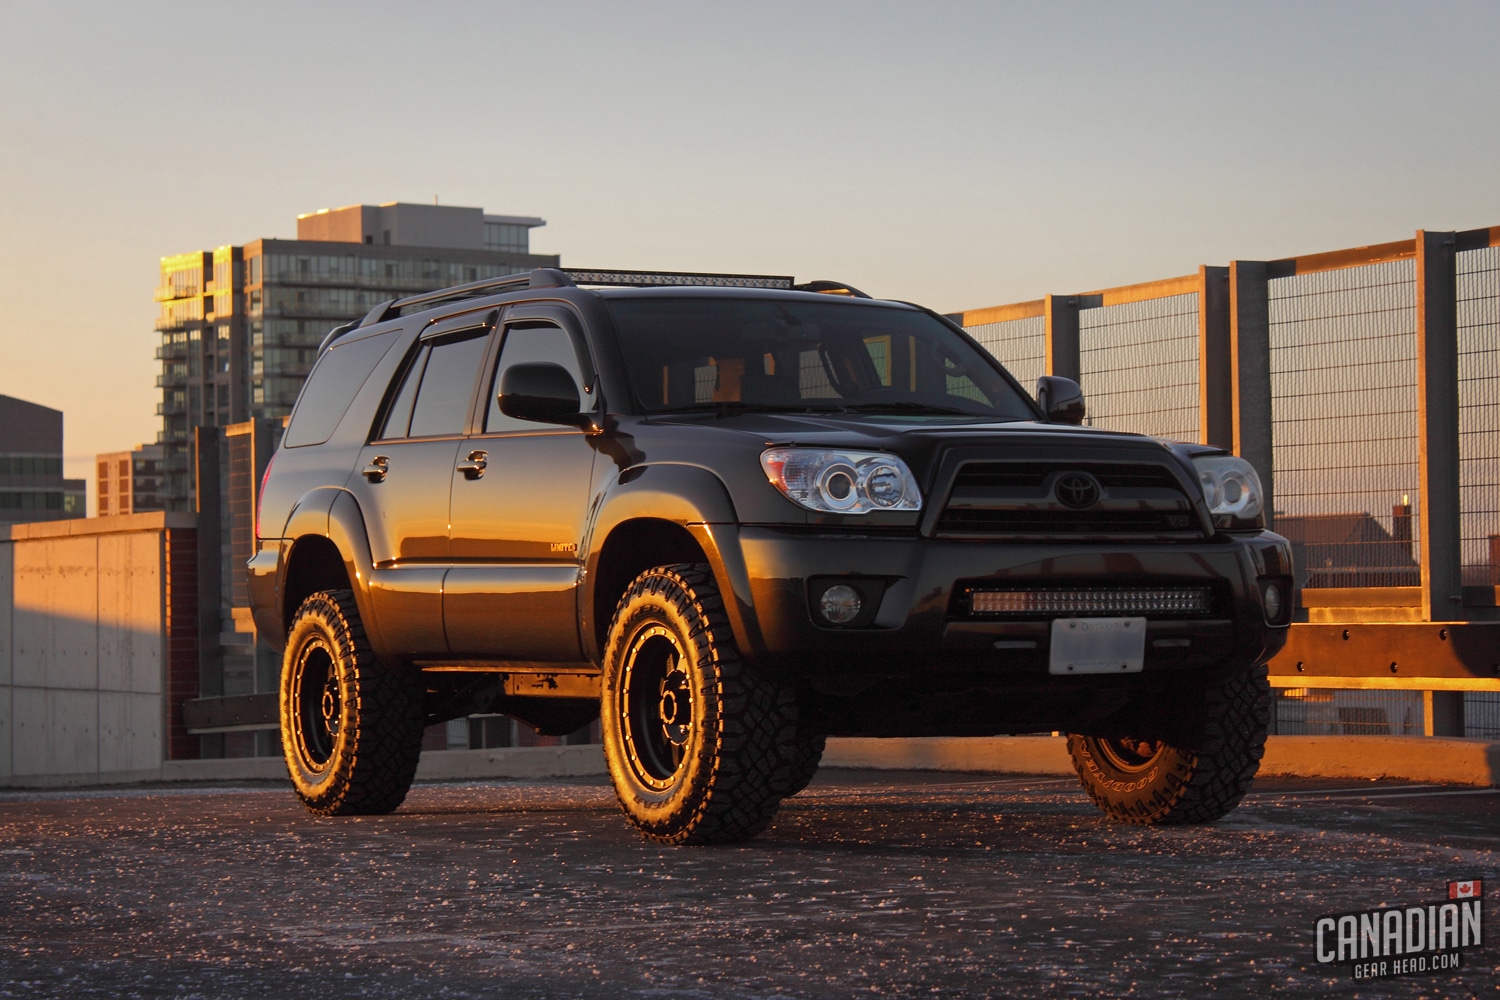
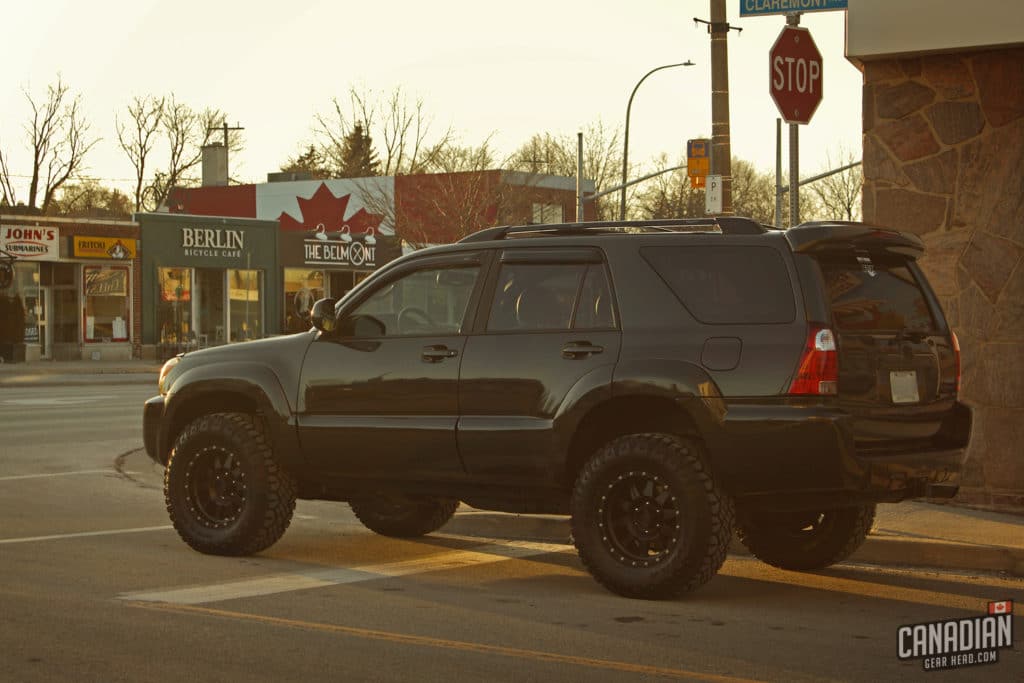
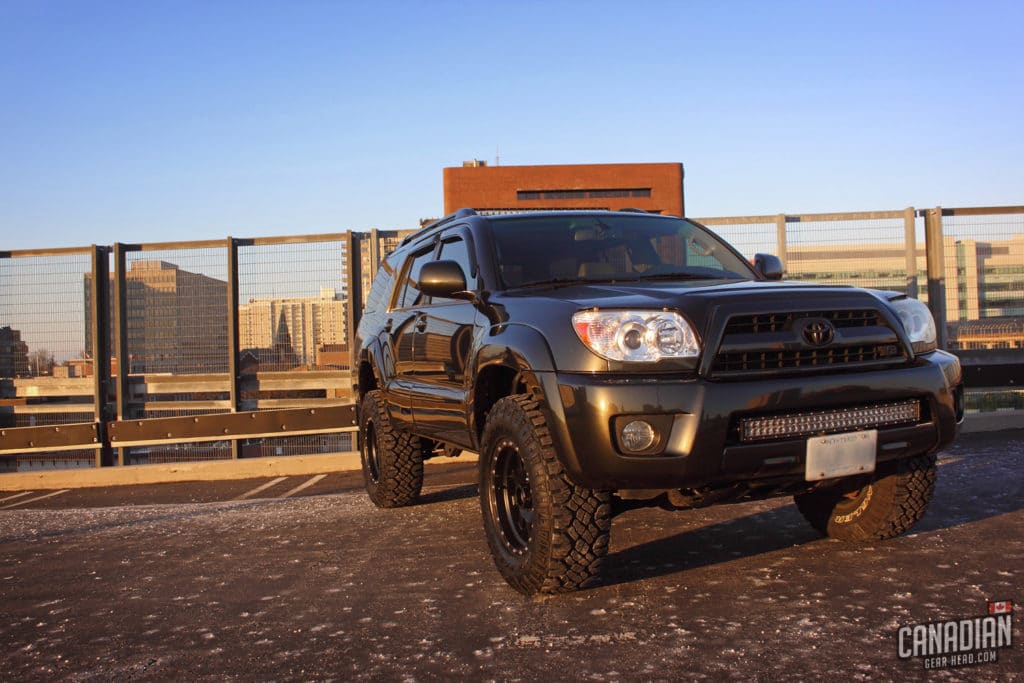
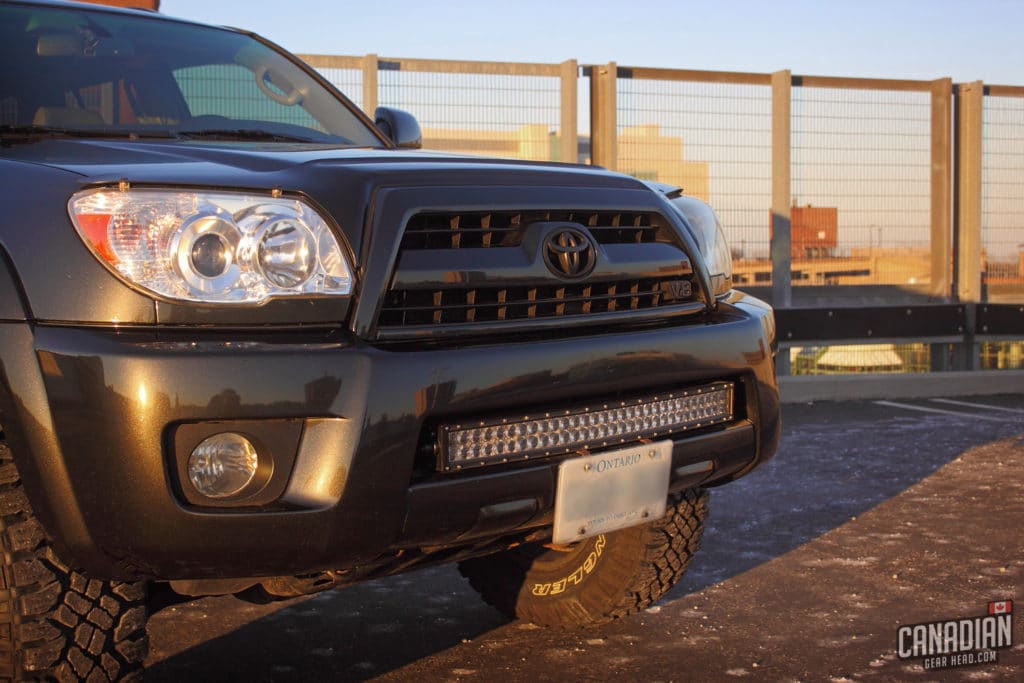
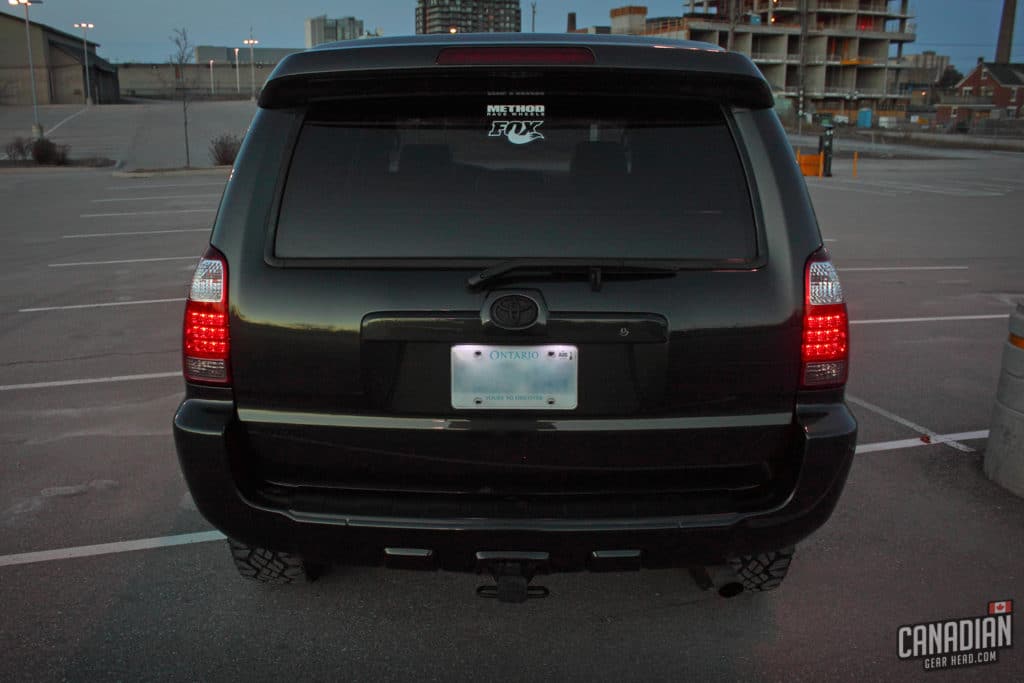
Possibly the most noticeable change is the large wheels and tires. Gone are the factory 18″ limited wheels. The 4runner now proudly wears a set of matte black 17″ Method Standard wheels wrapped in 33″ Goodyear Wrangler Duratracs. These are much larger in both width and diameter than the original setup and while the rears fit without modification, some trimming was needed up front.

Thinking about buying a Toyota 4runner for yourself? Make sure to read my Ultimate 4th Gen 4runner Buyer’s Guide:

Lifted 4th gen 4runner

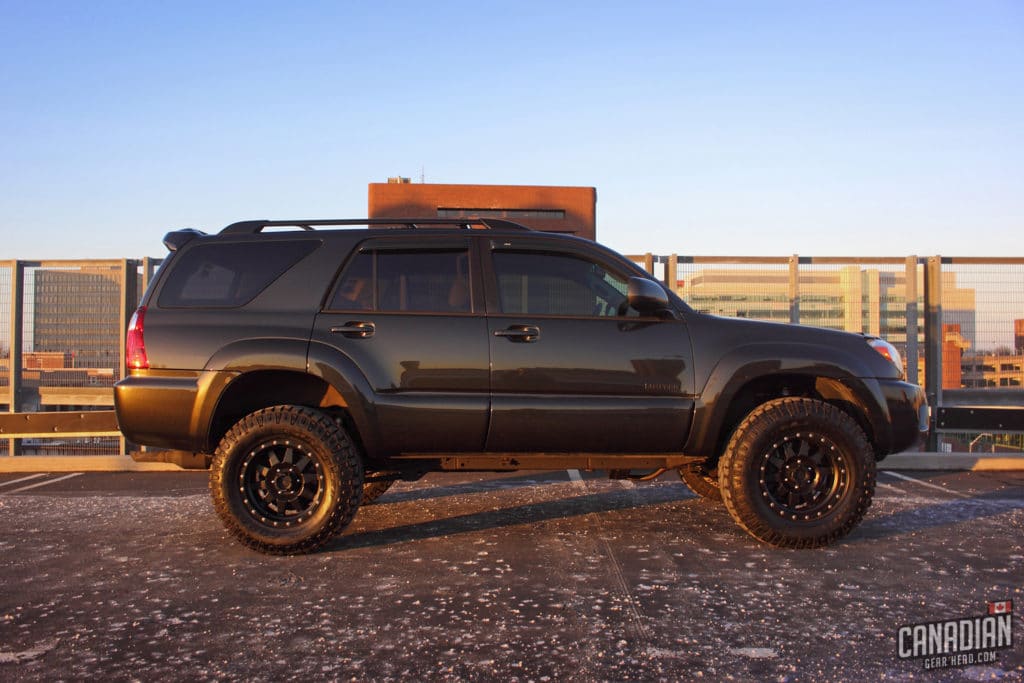
The running boards and mud flaps have been removed for extra clearance. The inner fender liners up front were also moved forward a few inches to make room for the tires.

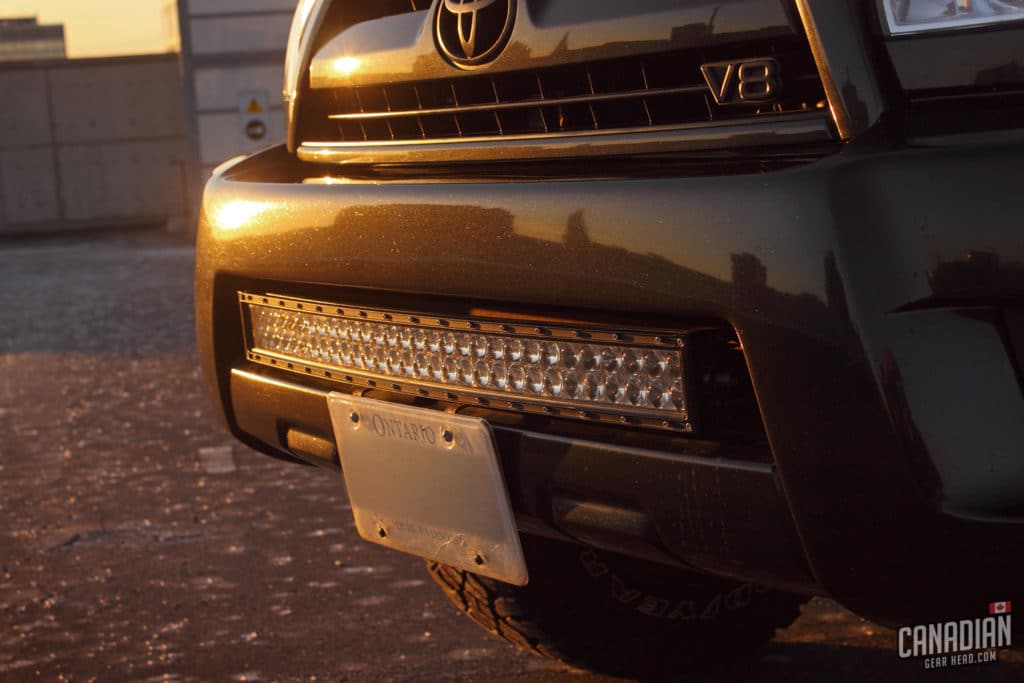
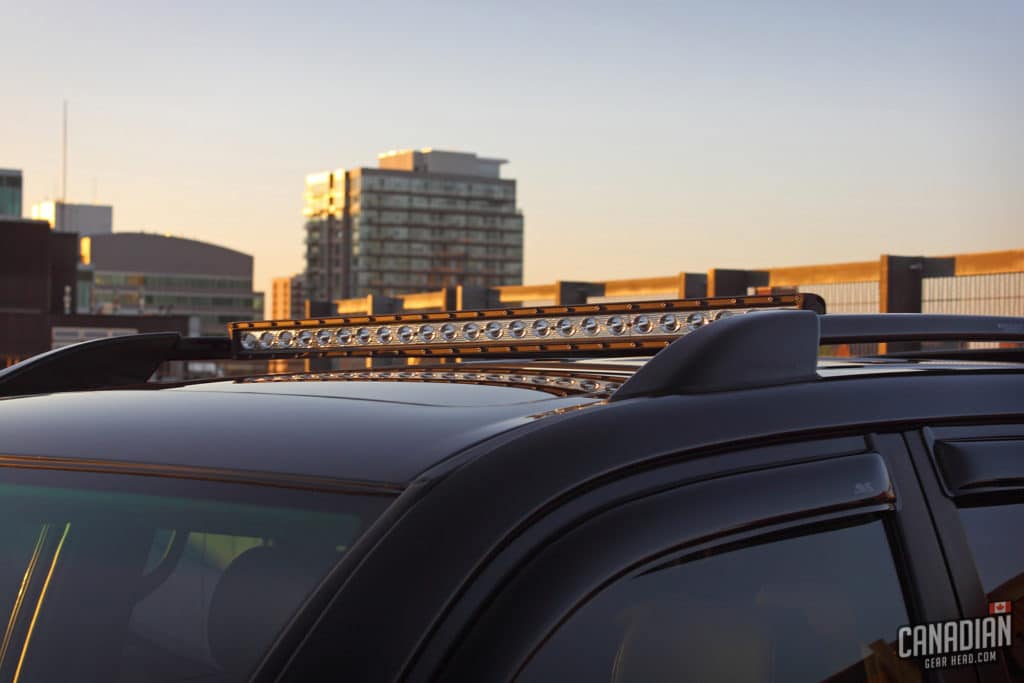
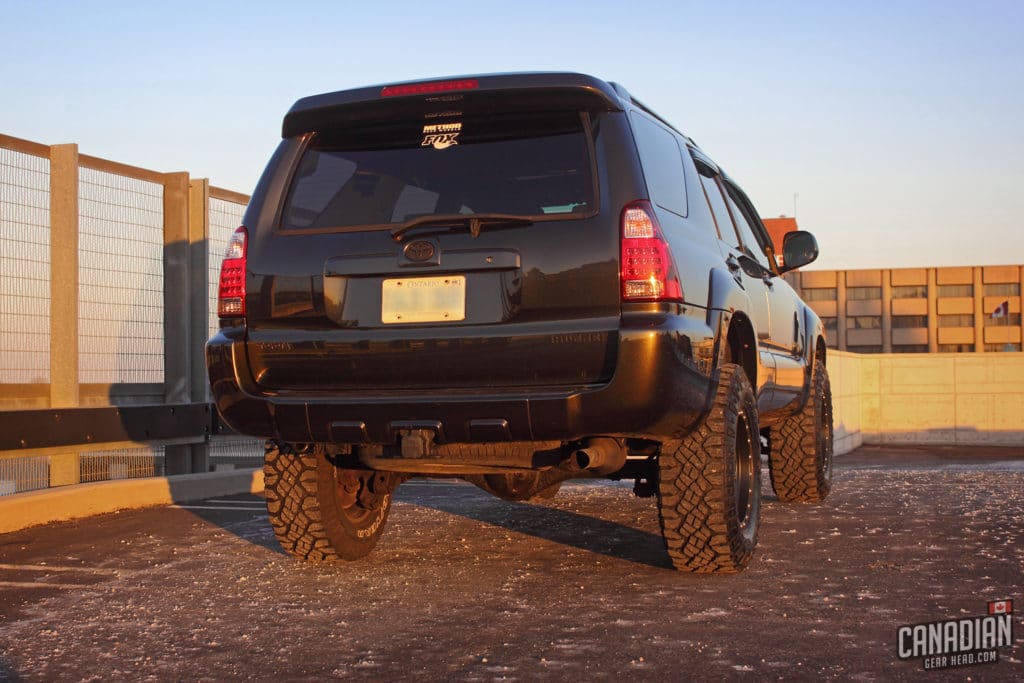
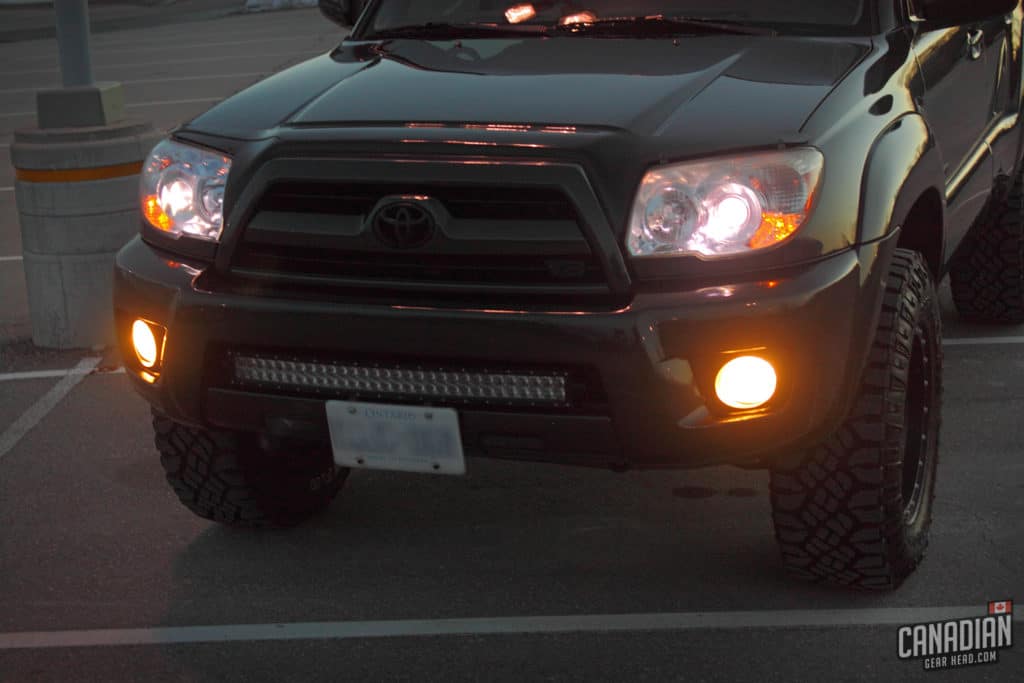
I chose to go with a more stealth approach to auxiliary lighting. There’s a 32″ curved Philips LED light bar in the bumper and a 40″ Cree LED light bar mounted to the roof rack. Both are sitting on homemade mounts. These are barely noticeable during the daytime, but extremely effective at night.

The appearance of the 4runner might be slightly aggressive, but it rides like a Lexus. The suspension is smooth, the tires are quiet and the V8 has lots of power. A few hours on the highway can easily make you forget what this thing is capable of at lower speeds.

Lifted 4th gen 4runner

One of the best things you can do to make an average vehicle stand out from the crowd is a proper paint correction. My 4runner underwent multiple steps of compounding and polishing, followed by a ceramic coating from Gtechniq. As a matter of fact, most of the surfaces are ceramic coated. It allows for a quick cleanup after the abuse it sees occasionally.

Lifted 4th gen 4runner

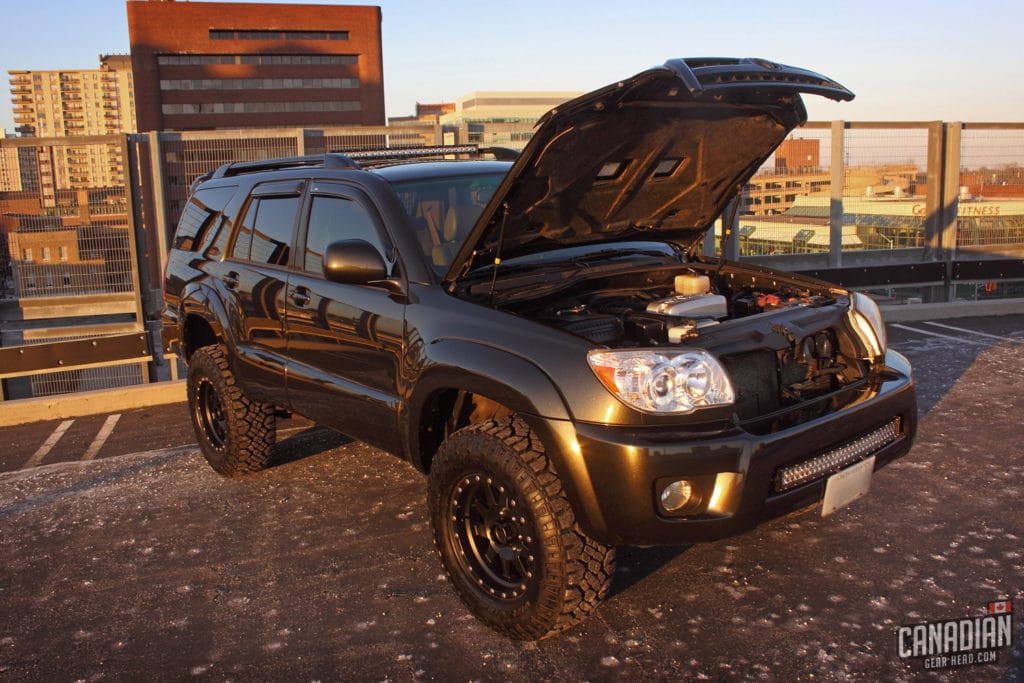
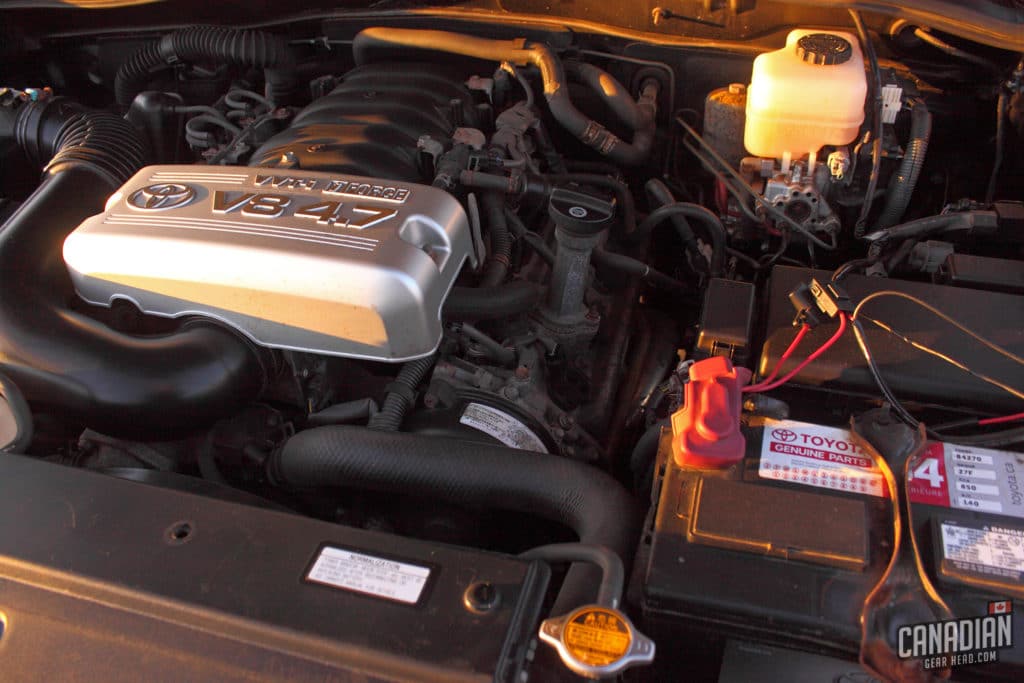
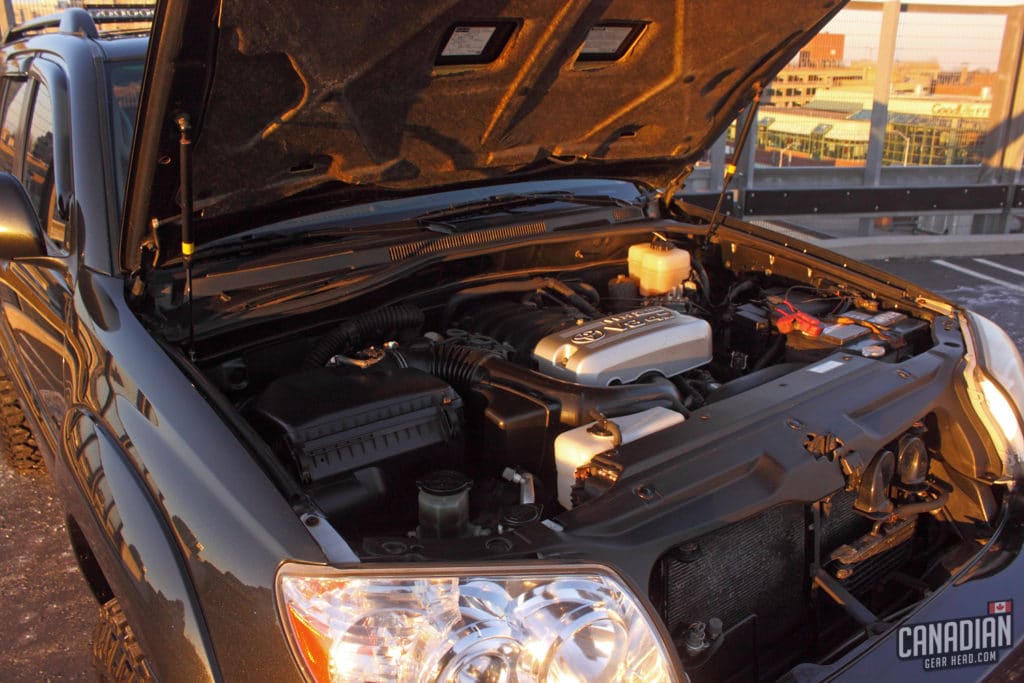
Under the hood, there really isn’t much going on. A set of Doug Thorley short tube headers and a K&N filter (with hydrocarbon filter delete) are the only modifications. This isn’t a go-fast vehicle, so I don’t see any need to be chasing horsepower. The 4.7 liter V8 gives the 4runner lots of get up and go, even with the big heavy tires.

The headers have increased fuel efficiency quite a bit along with the horsepower and torque gains. They would benefit from a complete matching high flow exhaust though. I kept the factory cats and exhaust system to keep it quiet and emissions compliant.

The badges have been blacked out by the previous owner, making it less obvious that this is in fact a Limited V8 model.

Lifted 4th gen 4runner

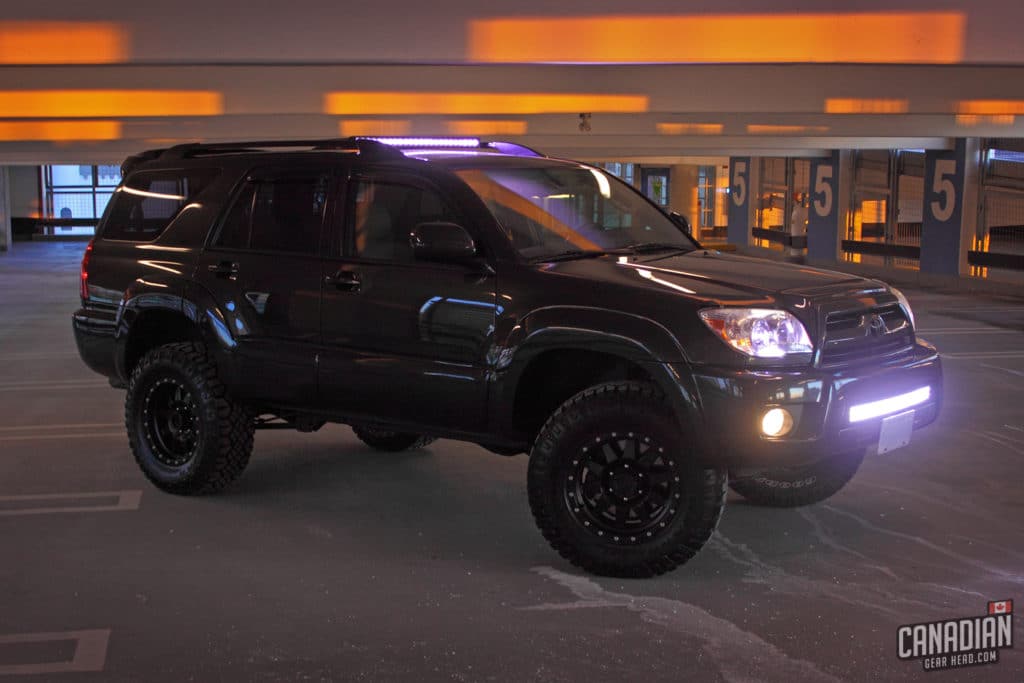
The Shadow Mica paint is a bit of a chameleon depending on the conditions. Usually, it’s a dark metallic grey but as you can see it changes with the lighting. The pearl really reflects the sunset, yet it looks black at night time.

4th gen 4runner interior

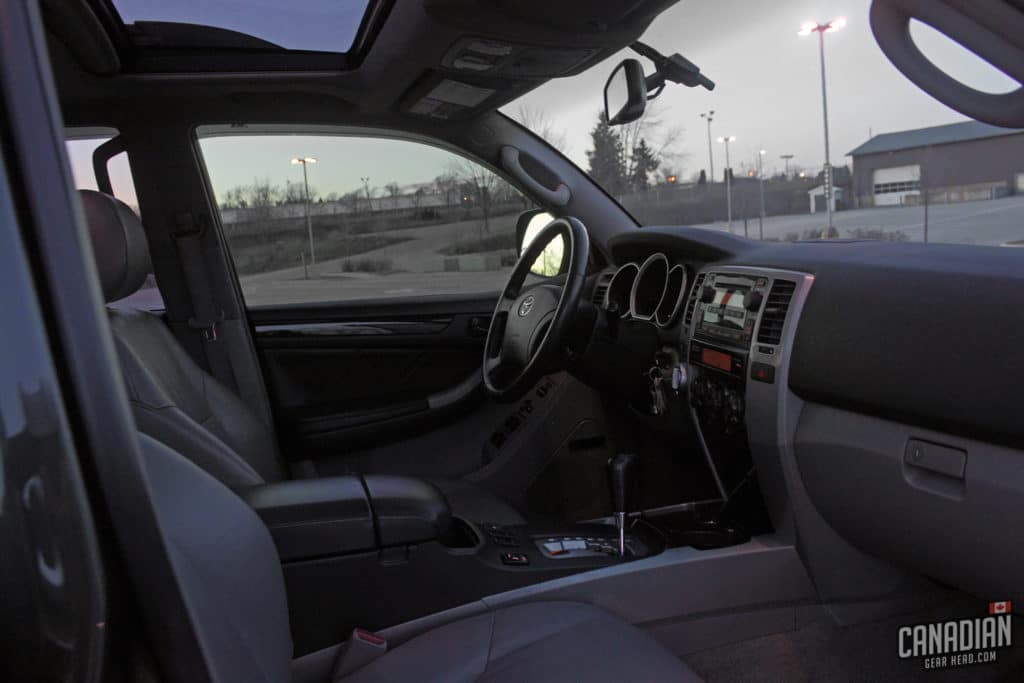
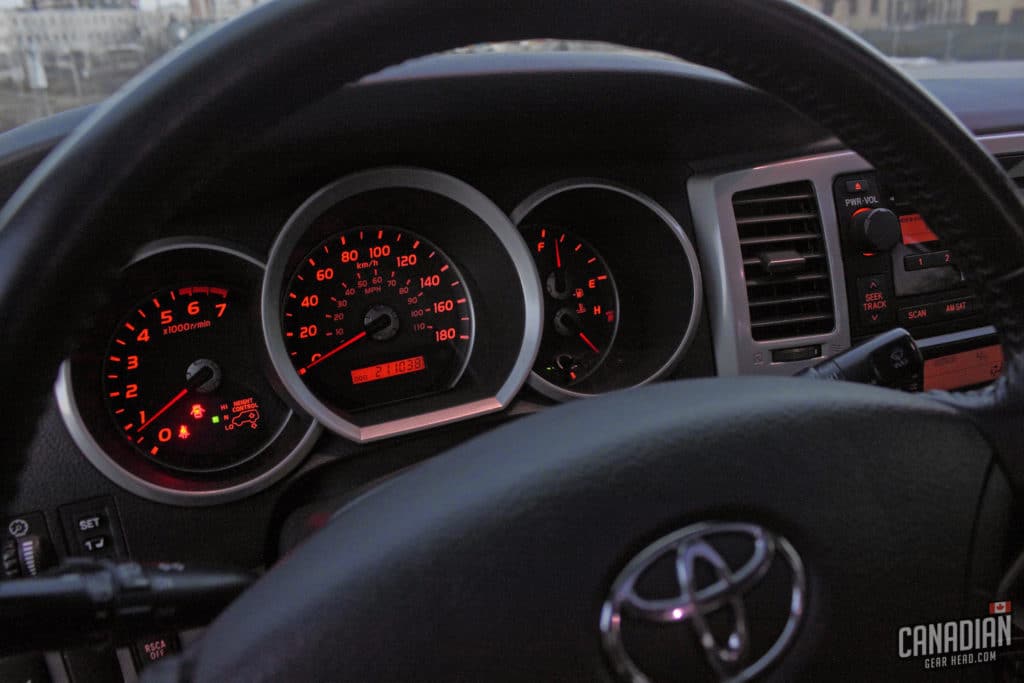
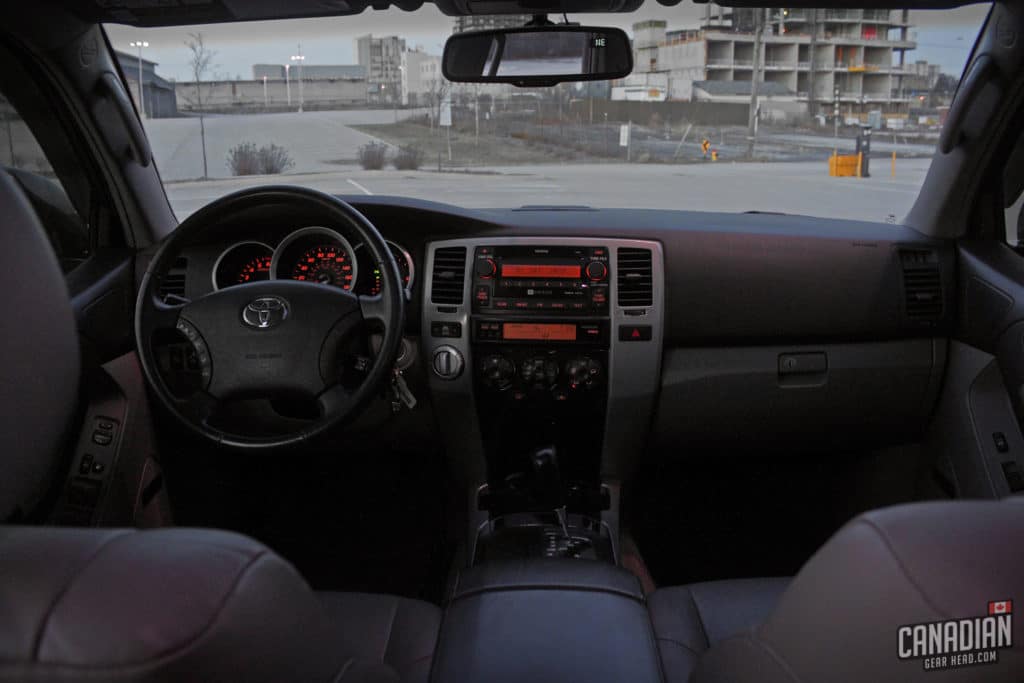
The interior is completely stock and will likely stay that way. Toyota already gave the Limited model 4runners features like heated leather seats, simulated granite trim, and a decent JBL Synthesis audio system. Aside from navigation and Bluetooth, it’s got everything I need. The head unit might be a future upgrade.

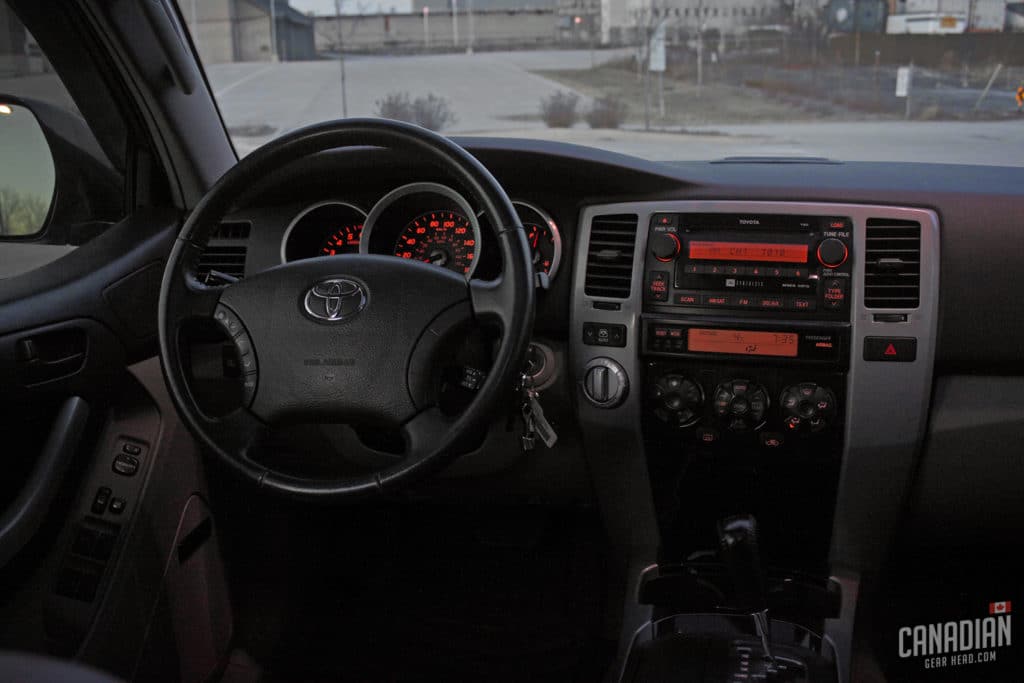
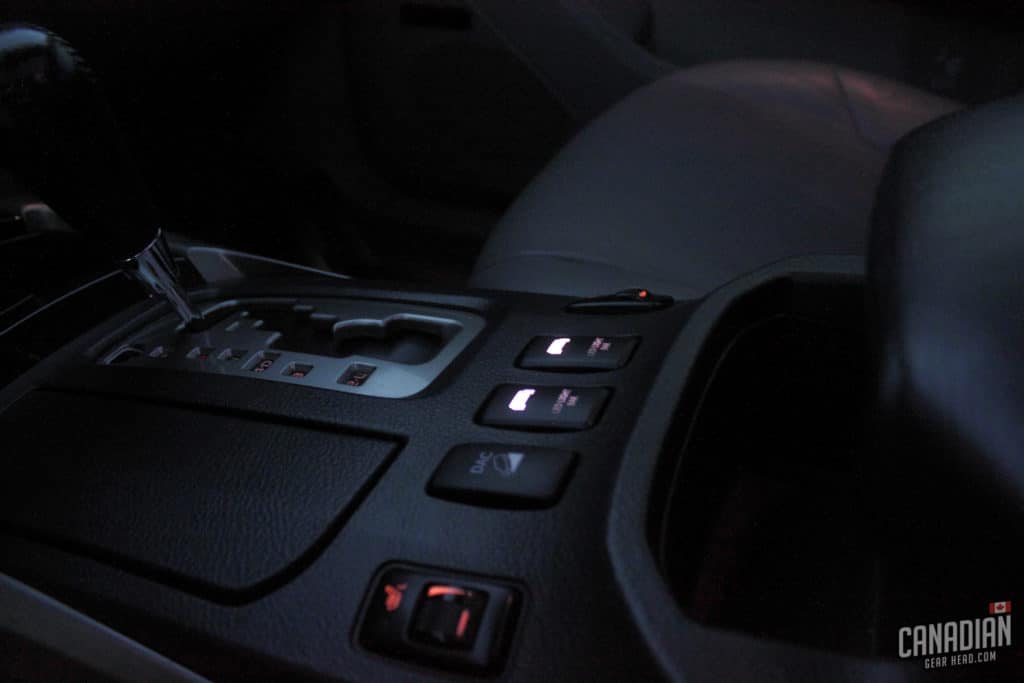
The only aftermarket feature in the interior is the switches for the light bars. I wanted to keep it just as stealth on the inside, so I found a pair of OEM style on/off buttons from MIC Tuning. They fit perfectly in the spots that used to hold the controls for the now vacant air suspension. No new holes, no exposed wires.

4runner led tail light

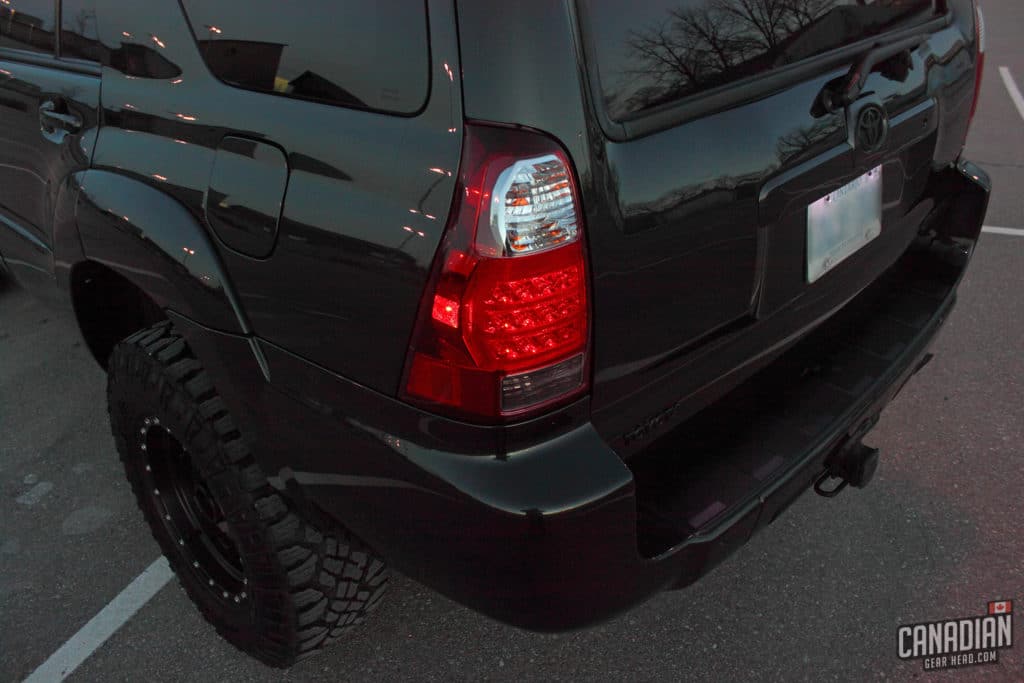
Toyota gave the later year facelifted model 4runners projector headlights and LED taillights. These did a great job of making the exterior look more modern. To take it one step further, I added some LED headlights and replaced the bulbs in the license plate and interior with LEDs.

If you’re interested in buying your own 4th gen 4runner, make sure to check out my Buyer’s Guide

The Specs:

Fox 2.0 IFP adjustable front coilovers
Fox 2.0 IFP rear shocks
ARB Old Man Emu 895 rear springs
Metal Tech rear coil conversion kit
Method 301 The Standard wheels – 17×8.5″ with 0 offset and 4.75″ backspacing
Goodyear Wrangler Duratrac tires – LT285-70-17
Doug Thorley short tube headers 
K&N air filter with Hydrocarbon filter delete
AVS Window visors
Toyota bug deflector
32″ Philips curved dual row LED light bar
40″ Totron single row Cree LED light bar
MIC Tuning oem style light bar buttons

Detailing Products Used:

Complete paint correction and deep cleaning of the entire vehicle
Gtechniq Crystal Serum Light topped with Exov3 on the paint, headlights, and tail lights
Gtechniq C5 Wheel Armor on the wheels, lug nuts, suspension, and light bar housings
Gtechniq C4 Permanent Trim Restorer on black plastic exterior trim and fender liners 
Gtechniq G1 ClearVision Smart Glass on all windows including moonroof
Poorboys Bold N Bright Tire Gel on tires
Gtechniq L1 Leather Guard on seats
Gtechniq I1 Fabric Guard on carpet
Gtechniq C6 Matte Dash on interior plastic trim

If you enjoyed this post, I want to hear from you!  Tag me on Facebook, Instagram, Twitter, or leave a comment below.

31 responses to “The Daily Grind: My 2007 Toyota 4runner”

  1. Dann Olesen Avatar
    Dann Olesen

    Hey Tim
    I just bought an ’07 Sport Edition in charcoal metallic and would like the grille and badges to be either body-colour or black. Any suggestions regarding how to go about this?
    Thanks!
    Dann
    London, ON

    1. Canadian Gearhead Avatar
      Canadian Gearhead

      The easiest way would probably be to use Plastidip. There should be lots of tutorials on Youtube.

      -Tim

  2. Tom Avatar
    Tom

    No spacers ok

    Seems like the perfect wheel. I would like a touch more “poke” or negative offset but i DO NOT want to run spacers
    Any recomendations? Also do you know if method does a scratch and dent sale? Defective wheels cosmetically sold cheaper?

    And you did not have to trim the frame to fit those tires?
    Thats my main question! ?

    Basically im lookin to achieve the same look and function As you have done. Not that i troll other peoples vehicles its more so gaining knowledge.
    Also im coming off a 97 XJ solid axles and room to fit 35” besides gears being the bottle neck. IFS is new to me

    Your front coilivers are adjustable which i would like to know how much lift are you running? Any before and after measurements? If you could measure center wheel to fender i could figure it out based on my truck

    Based on the rear springs ur running it comes up as a 2” lift. Based on factory rake, id assume your front is set to around 3”?

    Your info is soo helpful. Actual real life info vs the typical forum info which basically is he said she said

    1. Canadian Gearhead Avatar
      Canadian Gearhead

      Not sure if Method offers many options for offset. You’d probably have to use spacers if you’re looking for minor adjustments. I haven’t had to chop the body mounts but my alignment is also not in factory spec. My coilovers are still where Fox sets them at – probably a bit over 2″ of lift. You’re right, the rears are 2″ so it still has some rake. Thanks for reading.

      -Tim

  3. John Avatar
    John

    Gorgeous build. Honestly, your first sentence- I think about that a lot. I live in a major east coast metro and see the same vehicles day in and day out. Walking my dog I counted 7 Subaru Outbacks on two streets a block from my home. I’d like to tally up the CR-V’s, Rav4’s, and Civics while I’m at it… Look, there’s nothing wrong with those vehicles and in those specific cases (especially in the last few years) those brands have built pretty quality joe-consumer level vehicles which I would absolutely suggest to everyday folks. However, life is too short to drive your neighbor’s (and their neighbor’s) car. I have a 2006 v8 with 129K as my daily and I appreciate that I am one of the only 3-4 4Runner’s of any year in my huge work parking lot of hundreds of vehicles. I get it- most people do not really care about their car/ daily driver. But man, my short commute is that much more fun and I don’t feel so much like one of the sheeple chasing middle-class paychecks at my 9-5 and I believe that philosophy is important for living a life that is meaningful to you as an individual. Again, great posts, love your 4Runner!

  4. Michael Toland Avatar
    Michael Toland

    How difficult was the Auxbeam install in your front bumper? I just bought the same one.

    1. Canadian Gearhead Avatar
      Canadian Gearhead

      Pretty straight forward, even easier if you buy pre-made brackets.

      -Tim

  5. Cooper Lee Avatar
    Cooper Lee

    hey! I’ve got a question: what kind of lift kit do you have on your 4runner??

    1. Canadian Gearhead Avatar
      Canadian Gearhead

      Fox 2.0 suspension with OME 895 rear springs

      1. Tom Avatar
        Tom

        Are you running stock UCA?

        Also whee spacers or is your stance soley due to the whee specs? Has a perfect look. Seems flush ? Or do the tires stick out alittle?

        Shocked you didnt have to body mount chop with 33” tires? Spec size is what 32.7”?

        1. Canadian Gearhead Avatar
          Canadian Gearhead

          No wheel spacers at all. The tires might stick out a bit but no more than an inch for sure. Yeah, 285/70 measures out to about 32.7″.

          -Tim

  6. Mark Avatar
    Mark

    Hey,

    Love your build. I’m hoping to build one similar to this in the coming months. Question (since I’m a newcomer to all of this) do you know of any instructions on trimming the fender liner for the larger tires or moving it forward? I would love to do this on my own, but don’t want to screw something up.

    Mark

    1. Canadian Gearhead Avatar
      Canadian Gearhead

      You might be able to find pics of where and how people have trimmed on the T4R.org forums if you do a search. Basically it’s just a matter of turning the wheels to full lock on each side and looking to see where it rubs then trimming a bit at a time until it doesn’t. Don’t forget to take into account the suspension travel from hitting a bump. Just take it slow if you’re not feeling confident. You can always trim more if you don’t do enough.

      I didn’t trim my fender liners, I just pushed them further forward, re-used the mounting holes in the bumper and drilled new ones in the liner where it lined up.

      -Tim

    2. Tom Avatar
      Tom

      Your rig is spot on. Classic. Only if they came like this in stock form. Clean and effictive

      Question regarding the suspension. Are you running UCA? Or stock?

      Any mods to the rear links? Im considering a similiar suspension but dobinsoms. And also kickin around the idea of long travel shocks. Any inout on this?

      1. Canadian Gearhead Avatar
        Canadian Gearhead

        Stock UCAs but thinking about upgrading soon. Rear links are stock. I’ve heard good things about Dobinsons but don’t know a lot about them.

  7. JohnD Avatar
    JohnD

    Hi there:

    I’m thinking of buying the Doug Thorley headers for my 2006 V8. I was wondering if you did the install yourself? If not, can you give me an idea was the installation costs were for you? I am also located in Ontario.

    Did you keep the existing four catalyst converters, or did they need to be replaced?

    1. Canadian Gearhead Avatar
      Canadian Gearhead

      I had a friend install them for me. Ballpark cost for a shop to do it would probably be somewhere between $800-$1200 if I had to guess. I reused the original cats, just had them welded onto the headers by an exhaust shop.

      -Tim

    2. Chris M. Avatar
      Chris M.

      Hey,
      Love the build, I’m pretty deep into my build and am trying to tie up some of the details, so I was wondering for your front license plate what did you use to mount it once installing the light bar?
      Thanks for your time,
      Chris

      1. Canadian Gearhead Avatar
        Canadian Gearhead

        I just used some L brackets from the hardware store and bolted them to the light bar mount. Simple, but works.

        -Tim

  8. Tyler Avatar
    Tyler

    Hey man,
    I was wondering, will I need the Metal Tech rear coil conversion kit if I’m lifting an 06 SR5 V8? I’d like to have a similar rig, I just didn’t know if I’d have to do anything differently since yours is a limited trim.

    Thanks!

    1. Canadian Gearhead Avatar
      Canadian Gearhead

      Hey Tyler,

      If you have the factory rear air suspension, you’ll need the Metal Tech kit (or build your own) to convert to coil springs. Being an SR5 model, you should already have springs in the rear – so you’re free to switch to whatever lift springs you want.

      Tim

  9. Morten Avatar
    Morten

    Hey man;

    excellent and very helpful write-up. Thank you! And truly a beauty of a 4Runner you have there!! Your info is exactly what I’ve been looking for, as I am myself considering a V8 4Runner. Your description of what you wanted in your vehicle is as though taken straight out of my mind. I kid you not. Amazing! But seeing as you likely aren’t interested in selling your 4Runner anytime soon, I’ll prob just have to find my own and go through the same mods you have. I currently have a ’99 3rd gen Limited, which I love – except for one thing: it’s just under-powered. I use it for long road trips (incl. camping and some logging roads), usually including driving through the BC/AB Rockies, and I could really use a V8.

    Sorry for my ramblings. Here are my questions:
    (1) would you mind sharing a sum total estimate of what you have spent on your upgrades, so I have an idea what kind of $$ I’d be looking at? (Apologies if you already mentioned this in the above.)
    (2) have you ever wished you had a rear diff lock? (I have used mine a couple times.)

    Thanks much for your help!
    Morten.

    1. Canadian Gearhead Avatar
      Canadian Gearhead

      Hey Morten,

      I occasionally think about switching to a pickup truck, but that would require selling the 4runner for a pretty penny. Likely more than someone would be willing to pay for it.

      Off the top of my head, I’d estimate the cost of the mods to be around $5k CAD. I think I’m going to break the numbers down in a video for the Youtube channel in the future. People seem interested in that.

      To be honest, there really isn’t enough hardcore wheeling available near me, so I haven’t really felt the need for a rear diff lock. That doesn’t mean I don’t want one though. I’m sure there’s a lot of cases where a rear locker would be the difference between getting stuck or not, I just haven’t been in that situation. Toyota’s ATRAC system does fairly well if you give it enough wheel speed to sort itself out, but a locker would definitely do a better job. If you felt you absolutely needed one, you could always turn to the aftermarket for that.

      Thanks for reading,

      Tim

  10. Carter Avatar
    Carter

    Hey, I am looking into getting the light bar on the bumper. I know you created your own harness but are there any that you know of that you’d recommend?

    1. Canadian Gearhead Avatar
      Canadian Gearhead

      Hey Carter,

      I didn’t create the harness, I just used the cheap one that came with the light. All I did was replace the switch. I built my own mounting brackets for it which I’m still not 100% happy with. If you wanted to go with a prebuilt option it looks like Caliraisedled.com offers a nice solution for around $60.

      Tim

  11. Kevin Avatar
    Kevin

    Hey man the runner looks great! I recently picked up an 06 v6 and your feedback has been super helpful. I was wondering about tires however! I’m thinking of getting duratracs as well but I’m a little worried about the weight with it only being a v6. What do you think?

    1. Canadian Gearhead Avatar
      Canadian Gearhead

      Hey Kevin,

      The Duratracs are awesome tires, but I won’t lie – they’re heavy. That goes for any off-road tire though so that’s just the price we pay for the extra capability. I’ve driven both V6 and V8 model 4runners and the V6 really isn’t a slouch. I don’t think you’d have any problems. You won’t be winning any drag races, and your MPG will take a hit, but that’s just par for the course when replacing a street tire with something more aggressive.

      Tim

      1. Juan Cardona Avatar
        Juan Cardona

        Great write-up! I’m glad Indiscovered this site and your YouTube channel. Do you plan on explaining the detailing process you used on your 4Runner with the cercanía coating and the compounding? I have just purchased a similar black 2009 and would love to keep it in good condition as I work in the countryside (Colombia) with a fair share of mud, sand and off-roading (nothing too extreme, though)

        1. Canadian Gearhead Avatar
          Canadian Gearhead

          It’s due for some TLC so I’ll probably get some video while I clean it up. I’ve been neglecting it lately. I just posted a POV compounding video a couple days ago. I’ll have a much more in depth video explaining the process on that Datsun coming up soon as well as one explaining how to apply the Gtechniq coatings that I have on my 4runner (on a Harley though). I’m also planning to do a long term review article on the Gtechniq coatings here on the site as well so definitely stay tuned! Appreciate any other ideas for content that people might have, so keep them coming.

          -Tim

  12. Jack Avatar
    Jack

    I have an ’04 V6 4Runner. I don’t think I need exhaust manifolds or anything. What was the total price of the wheels, suspension components and light bars?

    1. Canadian Gearhead Avatar
      Canadian Gearhead

      Probably around $5k CAD. I’ve only heard of rare cases where the manifolds failed on a V6 so you should be fine there.

      Tim

Leave a Reply

Your email address will not be published. Required fields are marked *

Latest posts

  • Auxito AJ01 Review: The Idiot-Proof Jump Starter

    Auxito AJ01 Review: The Idiot-Proof Jump Starter

    Have you ever left your house on your way to work, only to find out that your car won’t start? A dead battery is one of the most frustrating things on the list of scenarios that will make you late for work. If you find yourself in this situation, you have a few options to…

    Read more

  • 41 Ways To Make Your Car Look Awesome (Detailing Checklist)

    41 Ways To Make Your Car Look Awesome (Detailing Checklist)

    I’ve heard people complain about the term “auto detailing” and that it should really just be referred to as washing a car. And if you’re describing some of the lazy detailers out there, it’s probably accurate. But there’s a lot more to detailing a car than simply giving it a quick bath. It’s what separates…

    Read more

  • The Fastest Way To Wash Your Car (Under an hour)

    The Fastest Way To Wash Your Car (Under an hour)

    Have you been struggling to find time to detail your car or truck? It can be tough for car enthusiasts to take care of their vehicles when they’re busy with other things like work or a family. In this guide, I’ll walk you through a proven strategy to not only wash your car, but use…

    Read more